
- A loss of REG12V from the power supply triggers this protect event. This symptom is usually remedied by replacing the power supply board. If the error continues after the power supply board is replaced, suspect excessive loading which is causing the power supply to shut down. This is usually caused by a failure of the inverter circuits. Unplug the inverter and turn the TV back on.
- If a 6X error is displayed, the inverter (or LCD panel) must be replaced.
3 BLINKS
- The first thing to check when a 3X blink protection mode occurs is the physical condition of the speakers and speaker connections. The speakers should measure 8 ohms. Shorted speakers or connections can cause a 3X blink protection mode.
- If the speakers and connections check okay, then the defective component is on the main board. Either an open F4200, defective DC regulator or defective audio amplifier will cause a 3X blink protection mode which would require replacing the main board.
- A defect on the Power Supply Board may also cause a 3X blink protection mode and shut-off. Check the AU12V level at CN6704/pin 14. If 0V is measure before shut-off the power supply board needs to be replaced.
5 BLINKS
- A communications error with the timing control circuits (TCON) has occurred. If the TCON is available for replacement, replace the TCON. If the TCON is not available, the LCD panel must be replaced since the TCON circuit is part of the LCD panel assembly. In rare cases a loose or defective LVDS cable could also be the cause.
6 BLINKS
- If the inverter circuits fail to generate high voltage or one or more of the backlight lamps fails to light, the television will shut down and display this diagnostics error. Observing for the presence of backlighting is crucial in determining which component is likely at fault.
- If the backlights turn on before the 6X shutdown occurs, it is safe to assume that the inverter circuits are functioning and one of the lamps failed to ignite. Replacing the LCD panel is necessary. If the backlights never turn on before the 6X shutdown, the inverter has failed. If the inverter is available for replacement, replace the inverter. If the inverter is not available, replace the LCD Panel.
7 BLINKS
- A digital thermometer IC located on the main board provides a temperature reading of the chassis and LCD panel. If the temperature exceeds a pre-determined point the TV will shut down. If this problem occurs immediately at turn-on, the temperature sensing IC has failed and replacing the main board is required. If this occurs after the TV has been running for a while, check for ventilation issues that could cause the TV to run hotter than normal.
LED BLINK COUNTS

OVERVIEW OF STANDBY LED BLINKS

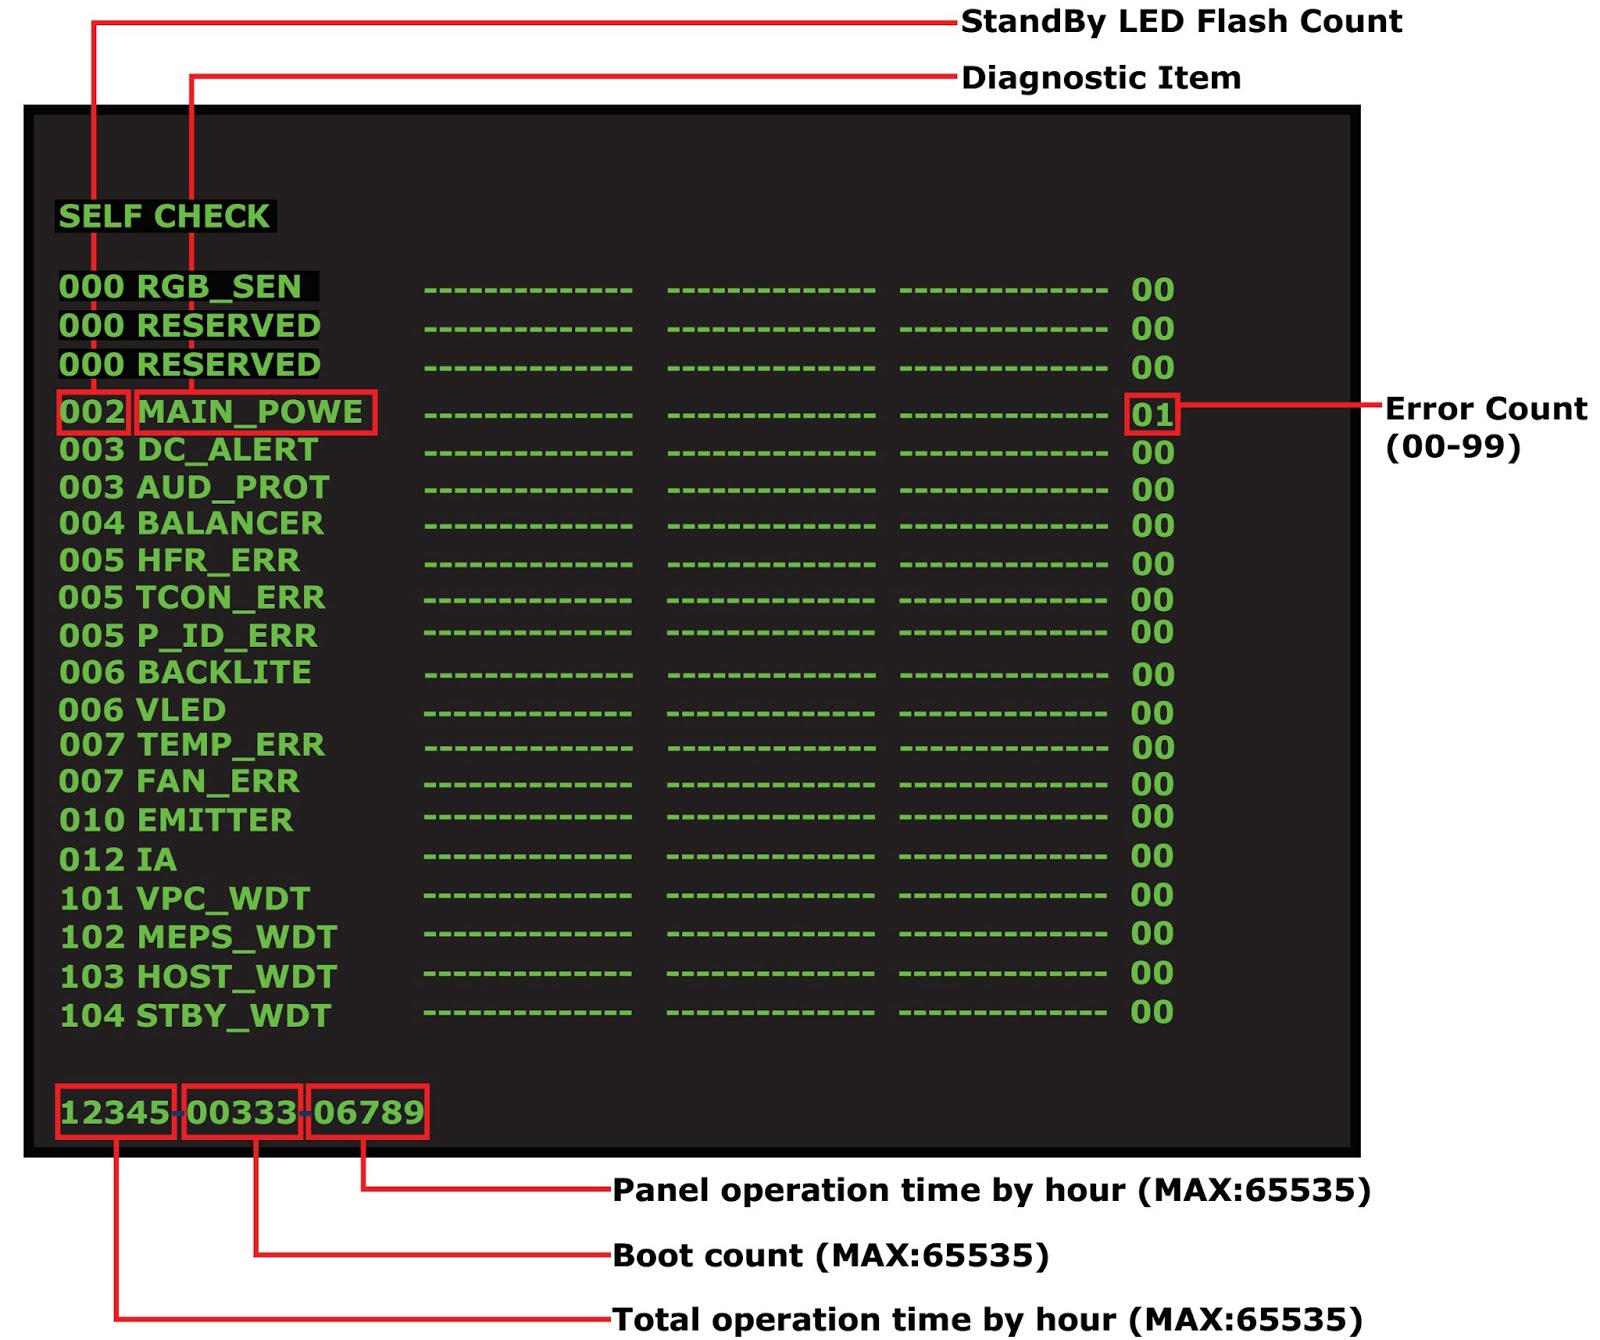
SELF CHECK DIAGNOSIS
VIEWING THE SELF CHECK DIAGNOSTIC HISTORY
It is possible to bring up past occurrences of a failure for
confirmation on the Self Check diagnostic history screen. This feature is
useful for failures, which are intermittent, or when the customer is not sure
what is causing the television to shut down.
- TV must be in standby mode. (Power off).
- Press the following buttons on the Remote Commander within a second of each other.
- DISPLAY à CHANNEL-5 à VOLUME (--) à POWER
- Self check diagnosis page will appear.
RESETTING PANEL OPERATING HOURS
The 3 sets of numbers displayed on the lower left corner of
the screen indicates the total accumulated operating hours of the television
and the operating hours of the LCD panel. Total operating hours is on the left,
boot count in the center and panel hours in the right group (The center numbers
are not used.)
- To clear the LCD Panel operating hours of the LCD Panel after replacing the panel, press [7] à [0].
TO EXIT SELF DIAGNOSTIC SCREEN
- To exit the Self Diagnostic screen, turn off the power to the TV by pressing the POWER button on the remote or the POWER button on the TV.